
Broadband Installation Guide: Steps & Costs Explained
A complete guide to the broadband installation process in India. Learn what to expect, the costs involved, and tips for a smooth setup from start to finish.
- The installation process involves cabling, router setup, and account activation.
- Choose a central location in your home for the Wi-Fi router for best coverage.
- Be prepared to provide Proof of Identity and Address during the application.
- Long-term plans often waive installation fees, saving you money upfront.
From Order to Online
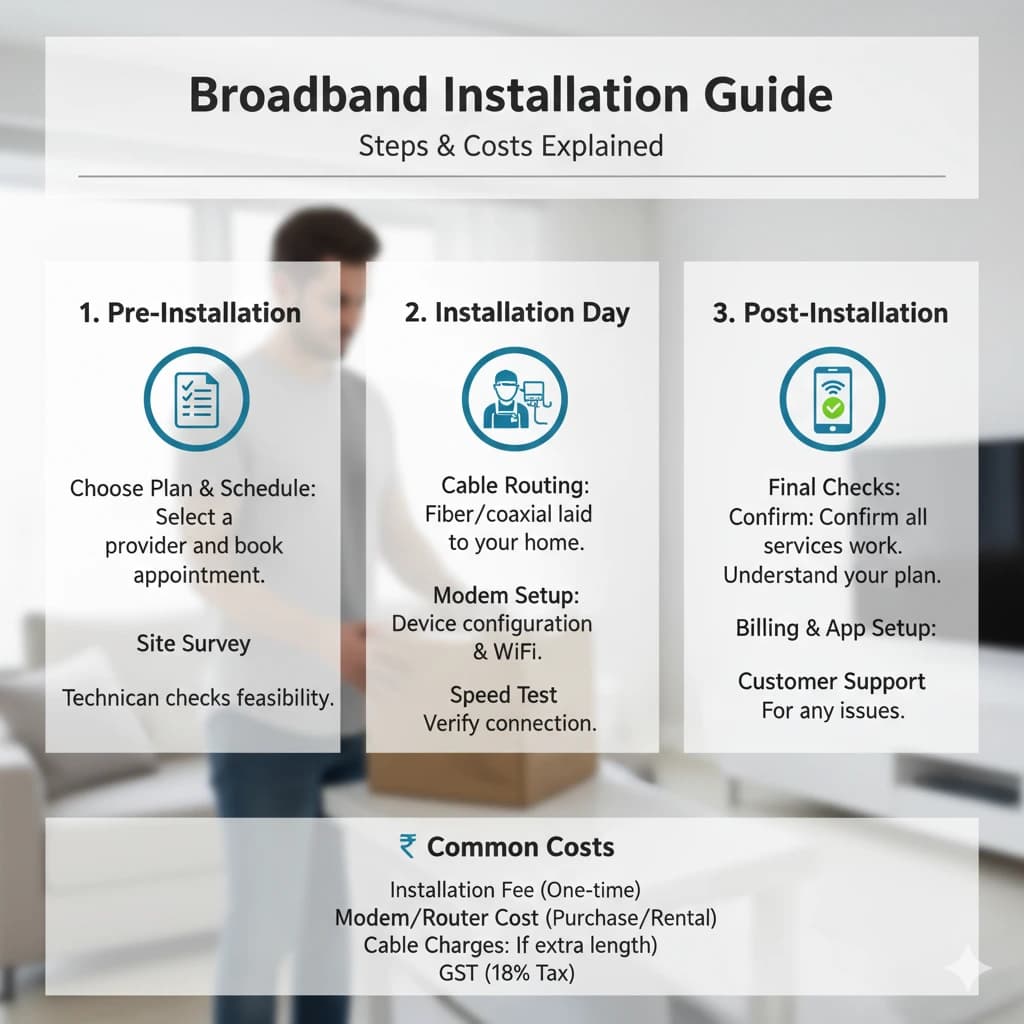
You've chosen your plan, and you're ready to get connected. What happens next? This guide walks you through the typical broadband installation process, so you know what to expect and how to prepare for a hassle-free setup.
Step 1: Placing the Order
The process begins when you order a plan, either online through the provider's website, via a sales agent, or by visiting a local store. You will need to provide:
- Your full address for the installation.
- Proof of Identity (like an Aadhaar or Voter ID card).
- Proof of Address (like a utility bill or rental agreement).
- A contact mobile number.
You may be asked to pay the first month's rental and any applicable installation/security deposit fees upfront.
Step 2: The Site Survey
In some cases, especially in new buildings or complex areas, the provider may conduct a site survey. A technician will visit to check the feasibility of laying the cable to your home and identify the best route from the nearest connection point (often a box on a nearby pole or in the building's basement).
Step 3: The Installation Day
This is when the main work happens. The installation team will:
- Run the Cable: They will run the fiber-optic or coaxial cable from the connection point outside your building to inside your home. This is often the most time-consuming part. Be prepared to show them where you want the cable to enter your home.
- Install the Router: They will set up the Wi-Fi router at a location of your choice. It's best to choose a central spot in your home for optimal signal coverage.
- Configure and Activate: The technician will configure the router, connect it to their network, and activate your account.
- Testing: They will perform a speed test to confirm the connection is working correctly and show you that you're getting the promised speeds.
Step 4: Post-Installation
Once the technician leaves, you should:
- Change the default Wi-Fi password to something secure.
- Connect all your devices and test the connection in different rooms.
- Download the provider's app to manage your account and monitor usage.
Understanding the Costs
| Cost Component | Typical Amount (₹) | Notes |
|---|---|---|
| Installation Charge | ₹0 - ₹1,500 | Often waived on long-term plans (6+ months). |
| Router Security Deposit | ₹500 - ₹2,000 | Usually refundable when you return the router. |
| First Month's Rent | Plan Cost + 18% GST | Almost always paid upfront. |
Recommended Plans
| Provider | Speed | Price | OTT Benefits | |
|---|---|---|---|---|
| 100 Mbps | ₹799/mo | |||
| 100 Mbps | ₹799/mo | |||
| 100 Mbps | ₹799/mo | |||
| 100 Mbps | ₹899/mo | |||
| 100 Mbps | ₹850/mo |